Archive | Uncategorized RSS feed for this section

New Look

3 Dec

Okay! So guess what?! I have not cut or dyed my hair in MONTHS! And it’s finally long and beautiful, so I can do more with it. Unfortunately, I seem to have lost my touch with hair styling -but I have some good news… I’ve undertaken MAKEUP ARTISTRY!!!

I’ve learned that you can make your face look like A DIFFERENT FACE with makeup, so in my case -being a butterface n’ whatnot- this comes in handy!!! So… Here goes!

1)Hair! We want BODY! And LUSCIOUS CURLS! I need to learn to use rollers… I didn’t quite get the hang of it this time, but I will learn because I am madly in love with full, flowing curls!!! So. ROLLERS. And if, like me, you suck at using rollers, just curl the ends. If you want to use extensions, go for it! Just make sure it looks natural and is made of human hair. 100% human hair extensions are infinitely better than fake ones because they can be heat-treated, permed, dyed, and washed!

Image

2)Boobs. If, like me, you are totally flat-chested, there are some tips and tricks for deceit and illusory cleavage!!! I don’t intend on picking up any guys, so I really don’t care that it’s a lie. I feel better about myself, and that’s all that counts! So, to get larger breasts, 1-The bra. 2-Highlighting with a little shimmer. 3-Halter it. I am usually an A/B cup, but as you can see, with a little magic, I can become a C easily. My next blog post will contain tips and tricks to make your breasts look larger. Image

3)Foundation/Concealer/Contouring – I had issues with this one… You really want an intense GLOW to your skin, so my makeup (all in powder form) didn’t really shine like I wanted it to, but from what I gather, you want to apply liquid makeup (preferably with some gold undertones) and buff it out with a kabuki brush. Make sure to use a concealer a few shades lighter than your skin for the under-the-eye area. Use matte brown eyeshadow or contouring powder to deepen contours in the cheeks, sides of the nose up to the eyebrows, under the jaw, sides of the forehead, and just above the chin below the lips (to increase the illusion of pouty lips!) Oh, by the way -SHIMMER POWDER EVERYTHINGGGGG!!! I have several shades of shimmer powder, so I used the dark for contouring, the light for highlighting, and the all-over shimmer to give my skin a nice glow.

4)Eyes – There are several different types of methods to doing the eyes, depending on what style you have. If you’re aiming for Adriana Lima, go with a fanned out black triangular-shaped wing at the outer third of the corner of the eye and use dark, rich brown colors. If you’re going for more of a Candice Swanepoel look, you want to use light colors, usually pink or beige, but darken the crease of your eye with a light matte brown color. False eyelashes are a MUST for getting this look complete. I simply played around with my own style -simple black wing with some browns blended in -not a lot, but just enough to make my eyes pop. (By the way, PAINT ON GEL EYELINER is the BEST PRODUCT IN THE WORLD!) Oh, and make sure to fill in and groom your eyebrows!Image

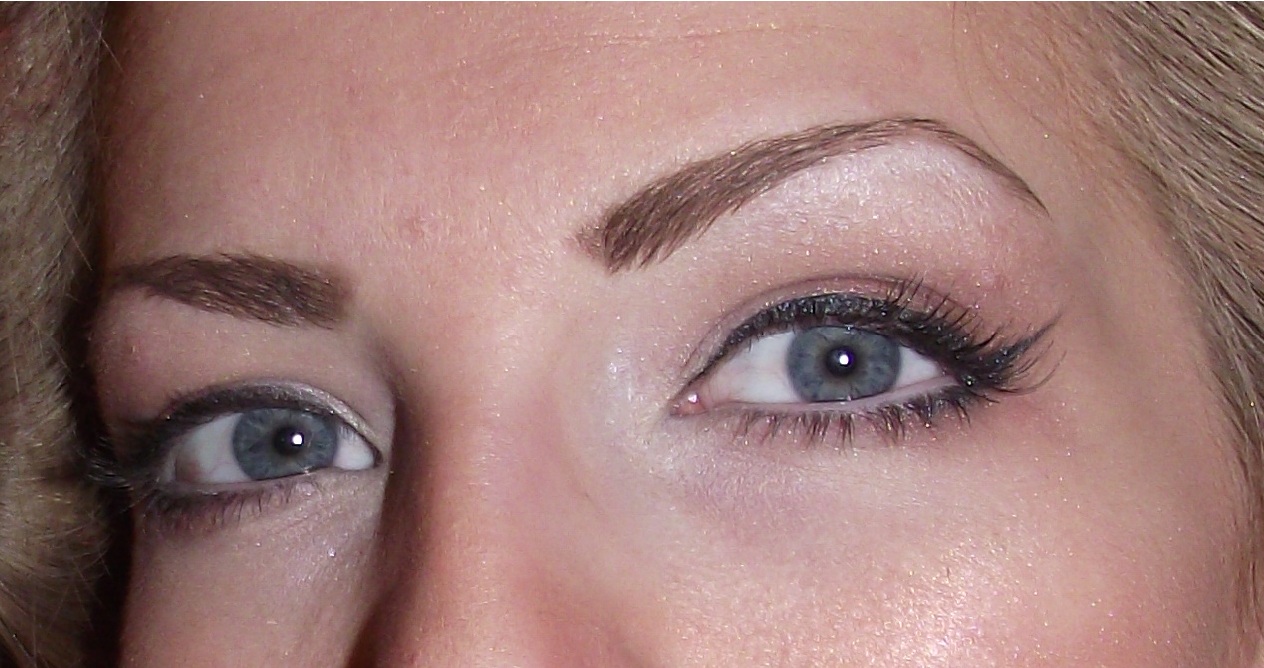
5Lips – For that extra pout, use lip liner along the edge of your lips. My lips are naturally almost RED, so I have to tone it down a lot with the colors I choose to wear. To give the lips that extra fullness, you want to use 2 shades of lip liner. Lighter (and a near-exact match to your natural color) for the outside line, and a darker color for the outside corners (color in your lips!)… this combination of light and dark makes the lips appear fuller! Oh, you can also, if you wish, apply a little concealer to the outer corners of the lower lip, which makes it appear poutier and makes the top lip appear larger! (No pic for this one because I’m still in braces and when I close my mouth, it looks like I have a mouth-guard under my lips).

Annnnd… BAM! I’m beautiful! Now all I need is a nice outfit to wear, and I’m ready to go out! 🙂

Image

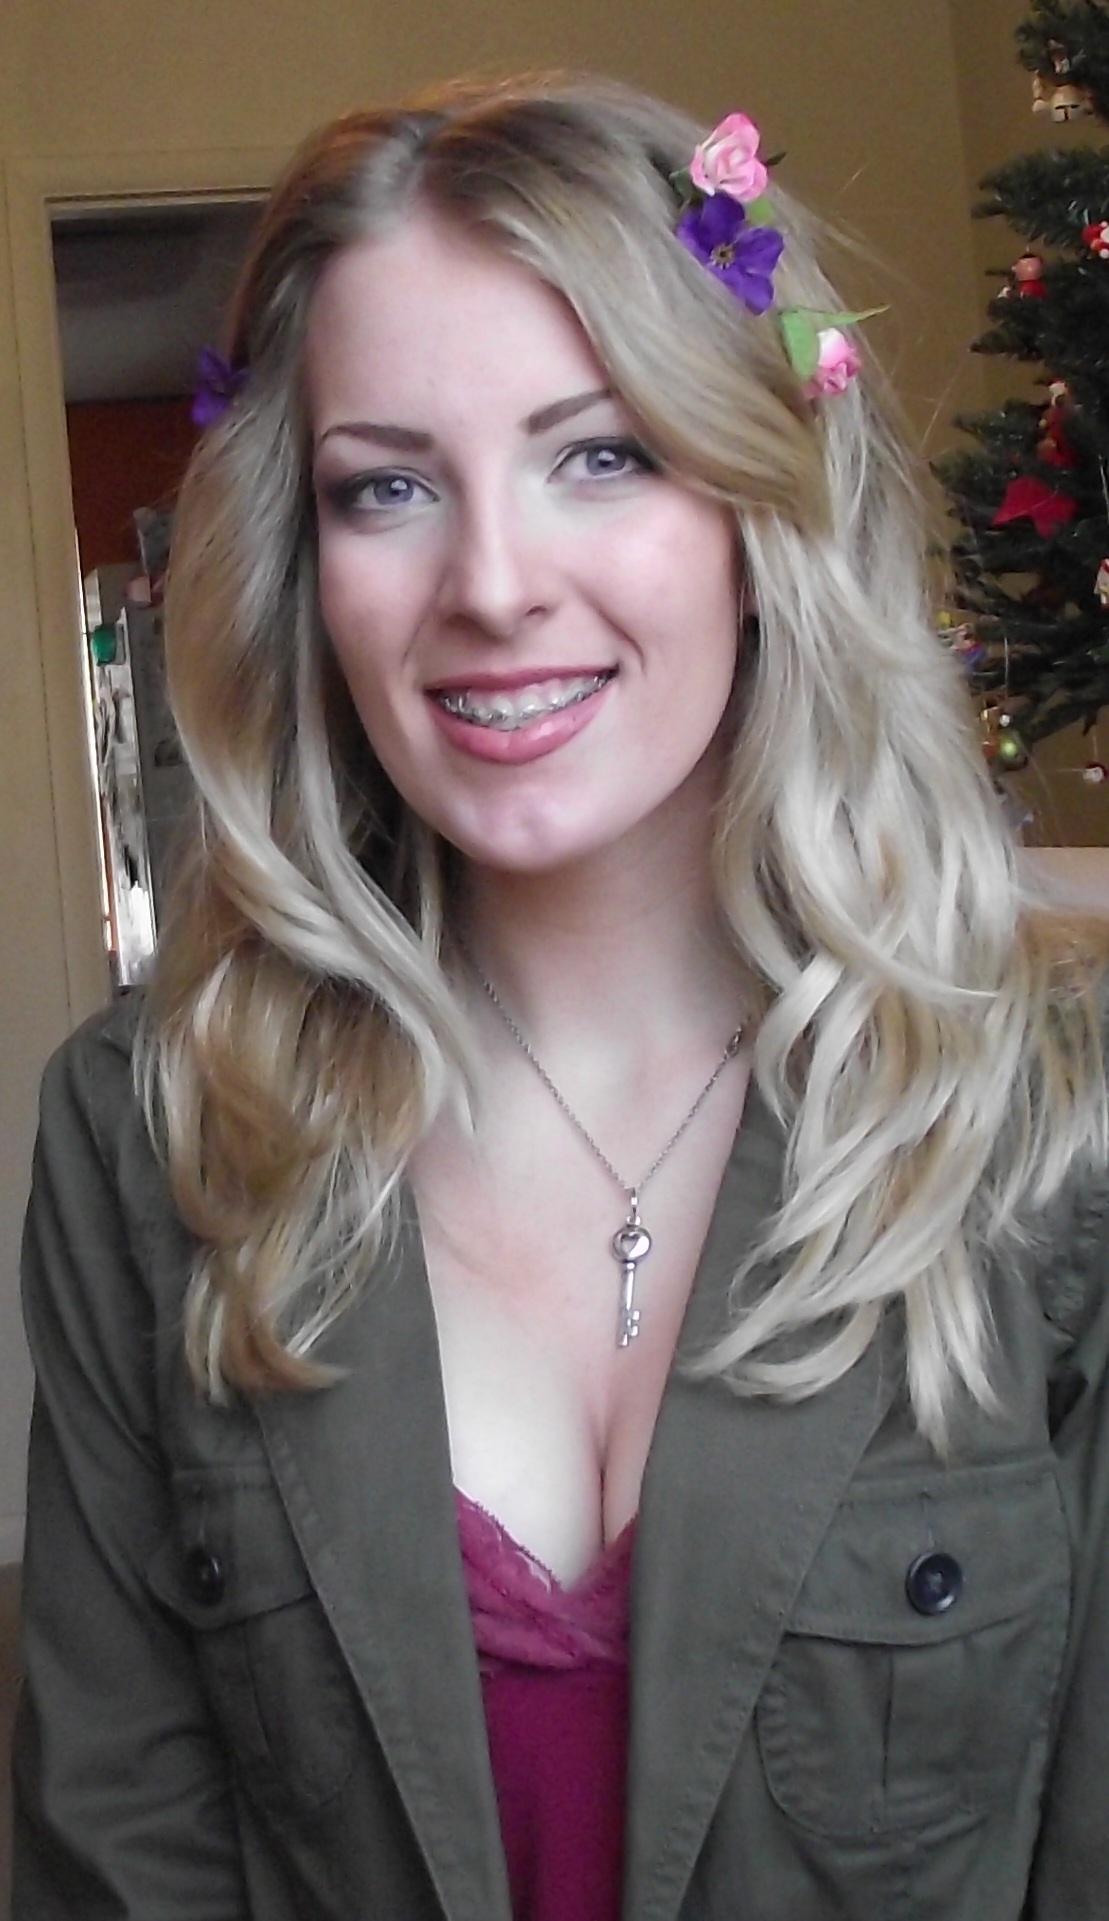
6)Photoshop! The above image is completely 100% untouched by any program, however, if you want to go the extra mile, photoshop yourself sexy! xD (Also, good lighting helps if you are planning to take pictures. I like natural sunlight because it makes my eyes look incredibly blue -however, warm lights (not fluorescent) bring out whatever shimmer is on your skin.

I don’t normally do this but…

12 Oct

I’ve entered a travel video contest and I need LIKES on YOUTUBE! Think you people can help me out!? I promise that if I have more than 200 likes by the end of tomorrow, I’ll give you all a super amazing fancy blog post to make up for it! ❤ Please LIKE and SHARE if possible! Thanks so much!!!

http://www.youtube.com/watch?v=Lr_VNUTvOeQ&feature=plcp

All Natural Hair Oil Recipe for Softer Hair

1 Oct

How do you usually style your hair? As you can tell by my blog, I am always experimenting with new looks; but all the heat and chemicals really take its toll on a girl’s locks. A few nights ago, I decided to take a night of rest from chemicals and hotplates, and I went the healthy route. I mixed together some vitamin E oil, argan oil, and extra virgin olive oil, and used the final combination to work into the ends of my hair. I went to sleep with my hair still wet, but the resulting style the next morning was a perfect, wavy, healthy, natural, beautiful hairstyle that has stolen my own heart!

I suppose the outcome really depends on what your hair type is (mine is extra fine and naturally wavy) but otherwise, this combination of oils really made my hair much softer than before. Aside from that, hair oils are extremely helpful for using straightening irons and curling irons because the oil protects hair from heat damage. Vitamin E is extremely good for the hair and skin. When rubbed into the scalp, it increases capillary growth and stimulates hair growth and preventing hair loss.

So here’s my recipe:
5 drops argan oil
2 drops vitamin E
3 drops olive oil

The recipe is for personal use and is simply my own home remedy to soften and treat damaged hair (can also be mixed with glycerine and heated for a hot oil treatment, which would ultimately be more beneficial to the hair). I will be freely posting some of my hair care “recipes” online so that you can try them yourselves! 🙂 I am considering purchasing other fancy hair oils and creating my own product line of these types of treatments, but for now I’d like to experiment a little more. If you’re interested in purchasing some products from me, let me know! I can even customize orders depending on your hair type and personal goals (hair growth formulas, volumizers, dry shampoos, etc), so if this interests you, shoot me a message! Take care! Peace ❤

I’M BACK!!!

29 Sep

Hello Everyone,

I haven’t made a post on this blog in quite some time. Mainly, I’ve run out of hairstyle ideas -but also, I’m trying to grow out my hair. And… I have a surprise for you all! I’m in the process of creating my own hair and beauty product line!!! I’ve already experimented with facial scrubs and bath salts (the non-zombie kinds) and now I’m moving on to hair care, my true passion. I really appreciate your loyalty to my blog -I was pleasantly surprised to find that despite my long absence, I still have hundreds of dedicated readers. So! My plan is to make the blog better for you all by posting more! If any of you have a hairstyle you would like to see or share, please send me a message or comment and I’ll get on it! 

2011

1 Jan

The WordPress.com stats helper monkeys prepared a 2011 annual report for this blog.

Here’s an excerpt:

A San Francisco cable car holds 60 people. This blog was viewed about 1,700 times in 2011. If it were a cable car, it would take about 28 trips to carry that many people.

Click here to see the complete report.

Tips and Tricks for Growing Out Your Hair

7 Nov

***Heavy Sigh***

Okay, folks… I’m wallowing in failure right now, and I’ll tell you why… I CUT MY HAIR AGAIN!!! D8/

I know! I know! I was supposed to grow it out! But to be fair, I had (and have) a LOT of split ends! And I only cut about 3 inches off… Still, I’m feeling lots of shame at the moment. SO! As inspiration to myself and some guidance for you all if you’re trying to grow out your hair, here are a few tips and tricks for growing out your hair.

#1) DO NOT CUT IT!!! x(
Well… An initial cut -as in my case- might be necessary if you have a lot of split ends. Also, I’ve noticed that if you cut it just a little, it seems to stimulate growth, but other than that, there is NO EXCEPTION to this rule! DON’T CUT IT!

#2) Use special shampoos and deep conditioners. They exist! Try Pantene Pro-V’s “Beautiful Lengths” shampoo. It’s specially formulated to stimulate hair growth, hydrate, and strengthen hair so that it’ll grow faster. I’ve been using Pantene Pro-V’s split-end repair shampoo and conditioner… but honestly, I think the shampoo isn’t really that great. If I didn’t have a huge bottle to use up, I would switch to the “beautiful lengths” kind. The split-end repair conditioner, on the other hand, is AMAZING. It’s protein enriched, so it really makes your hair feel great after use.

#3)Deep Conditioners & Oils. I finally bought some Argan Oil Styling Cream from Sally’s. It’s about $10 a bottle, and it works pretty good. Honestly, I don’t think it’s really helping my hair as much as the oil, but it smells pretty good anyway.

#4) Diet! BEANS, EGGS, CHICKEN, AND DAIRY PRODUCTS HELP HAIR GROW! The beans, eggs, and chicken contain protein; and the dairy products contain calcium; both of which are fantastic aids to hair growth! 🙂

#5) Don’t heat-treat your hair! If you heat-treat it, you’ll get split ends, strip your hair of moisture, and cause it to fry! This will prevent growth, but ALSO… do you really want a head full of COURSE, UGLY hair??? I’ve been refraining from using any sort of hotplates like straightening irons and curling irons, but I HATE looking ugly, and my hair is VERY ugly if it’s unruly; so instead of using hotplates, I’ve been using my hairdryer and different types of brushes (the small cylindrical metal brush for hair close to the roots, and a large flat paddle brush for the length of hair). If you get the right technique down, you can straighten your hair without using a straightening iron -and with minimal heat damage.

Well, I hope these tips and trips helped! Stay tuned for my next post about hairstyles that DO NOT require heat! 😀

Peace ❤

COMING SOON

12 Oct

Hello my fellow hair-junkies! 🙂
I just wanted to update you all with a super special secret surprise! I’M GROWING MY HAIR OUT!!! Why is this such a big deal, you ask? Well, for starters, I have NEVER been able to grow my hair out because I’m constantly fussing with my hair, either cutting it or dying it every month. It’s a compulsion; a habit; an addiction! Secondly, because of all this damage I’ve inflicted on my hair, I’m trying to “nurse it back to health” so to speak. This means that I’m no longer doing ANYTHING to damage my hair (save a blowdryer and the occasional straightening of my cow-licked bangs -which have already grown past my lips!) As soon as my hair reaches the desirable length, I’ll be posting various blogs featuring different haircuts (I will cut a little off at a time and showcase these styles myself about once every few weeks). All of this, of course, leading up to the PIXIE CUT!!!!!!!! *cue dramatic music now* So stay tuned!!! Stay fabulous! ❤ Peace.

Scoring Some Product

13 Sep

Awhile back, I bleached, blow dried, and straightened my hair until the strands each closely resembled a dead tree in winter… In case that visual wasn’t clear enough, I’ll just explain that my hair was 110% FRIED. Since I treat my hair like a living, breathing organism (that burrows into my skull and tells me what to do!!!) I decided that after so much trauma, it needed a little TLC. Now, I’m not really big on spending money, but for my hair I always make an exception, so I went to Sally’s Beauty Supply Company and purchased some Last Call Hair Masque and something new called Argan Oil.

First, I will say that Beyond the Zone’s Last Call Hair Masque ($0.99 at Sally’s) is a MUST when considering your poor hair’s aftercare. I would absolutely give it 2 thumbs up. Seriously, as much as I love my hair, this product makes me want to damage it more often so I can use it more frequently! xD (Not really, but still…)

Second… Argan Oil. Yes that was a sentence. This product is so incredible, you should -and pay attention, because this is my best advice ever- go to the store right this second and buy some. @_@ Seriously. Okay, so maybe I’ve gotten ahead of myself here… What is argan oil, you ask? It’s oil derived from argan trees in Morocco. Basically, these trees are dead and lifeless and ugly and serve no purpose… BUT. They survive. They survive in the most extreme desert heat and drought… The oil these trees produce makes a good hair care product because it does the same for your hair! And if you bleach, dye, or heat-treat your hair as often as I do, this really is the perfect preventative step to healthy hair. It’s a little on the expensive side ($10 for a 2 oz. bottle of oil), but you don’t need to use any more than a few drops, and the results are totally worth it. It also smells nice and makes your hair feel 10x softer.

Another plus to buying this product is that it makes use of an otherwise unusable resource, makes money for the poor country of Morocco, and it is environmentally friendly because its profitability has encouraged more protective measures for these trees (i.e., less people are destroying/burning down these trees).

Anyway, that’s all I have for y’all today! I still haven’t tried the Argan Oil Styling Creams or Shampoos yet, but I’ll keep you posted! Please feel free to leave any comments if you’ve tried this product or know of any other products that simply blow your mind! 🙂 Until next time, have a happy hair day!

Play the Part

12 Sep

So! I just returned from a month’s stay in South America, and I couldn’t be more pleased to see that my blog has grown to quite the large audience, even with the lack of posts.

Today I decided I needed a change, so I cut about 3 inches off my hair. BUT. That wasn’t enough. I was still missing something… In a previous post, I mentioned that a good way to switch things up is to change your bangs. I played a little with which direction my bangs would go, but ultimately decided on a straight part. Since my bangs have grown out, I no longer have any defining boundary for my bangs.

I have a very small head with an oval face-shape. (To determine your face shape, see the image below)

There are many “parts” you can use to enhance (or possibly detract) from your own natural beauty. Also, long/short hair makes a big difference here.

Side Part – I personally hate to see straight bangs with a side part. It bothers me because it takes the symmetry out of a simple straight cut. I think side parts work best with layered haircuts. (The long bang accentuates layered hair, and if it’s short hair, the long bang gives it more character in my opinion.)

Straight Part – Edgy. Sophisticated. Unique. With all the pop-icons going with side bangs, it’s pretty rare to see many people sporting a straight bang (and I personally admire those who do ;)). Anyway, you don’t want to go with a straight bang if you have a long face, as straight bangs tend to make the face appear longer.

Really, you should choose whichever look you like best, but if you do and it doesn’t match the “criteria” I just mentioned, find a way to pull it off! If you’re really skinny, make sure your hair has lots of volume so that you make an impression in front of people. If you’re really curvy, accentuate your curves and go with side bangs. If you have nice cheekbones, go with a shorter cut (I think I might be bloggin’ on a pixie cut soon *ear-to-ear-grin*). You know yourself better than anyone, and you probably spend more time looking at yourself than anyone else, so you should be able to deduct which part fits your personality better. Seriously, just play around with it! If you have some girlfriends, get them together and ask what they think -just don’t let them be mean… confidence is not so easy to rebuild, but it’s the most important to sustain. Good luck! And keep reading! I want to see these numbers DOUBLE next week! 😀 Peace.

XIX. Flipped-Out and Spiked-Up

19 Jan


Well, I must admit, I had higher hopes for this style when I first began. I wanted to create a hairdo using my “fake it short” method; using curls to hide the braided bun in the back.  <https://fancyburns.wordpress.com/2010/10/18/xiv-how-to-fake-a-new-haircut/> However, plans change. Once I had the gel [yes, gel, it was a last resort, I swear] in my hair and had blow-dried it upside down, it was SO flippy and textured from the gel, I just had to work it. After using the techniques described in the above link, I used my straightening iron to bring my do to new extremes. Whilst straightening, I pulled my hot iron upward and outward to get a cute little flip. I then repeated this until most of my hair was flipped outward. I kept my face-frame hair completely straight with no flips, and curled my bangs downward to hold a solid side-bang.

If you desire (which I ALWAYS do, since it’s so awesome), you can spike it! I ran out of product, but sculpting wax usually does the trick. Take a tiny bit of sculpting wax and rub it in your palms as you would lotion. Then take a large chunk of hair (this chunk should only include hair that is going in one direction; not multiple directions) and rub the hair back and forth between your palms until you get a twisty chunk which sticks together! Continue until the spikes meet your satisfaction, annnnnnd you’re done! Use finishing sprays to get it to stay. Enjoy the look! ❤ Peace.